Monday, January 4, 2010

When we purchased our lovely new abode, the previous owners had done us the favor of removing the carpet but had never done anything to refinish the hardwood in all the rooms but the kitchen and bathroom. So, we strapped on our dustmasks, rented a sander and got to work.

Here is Byron in his very best floor refinishing clothes.


A somewhat blurry picture of the floors in our bedroom, post-sanding. The paint in there looks much less grey and more blue in real life.


Another blurry picture (sorry!). This is, I believe, the office.


The guest room (these are all post-sanding, pre-finishing).


The final two pictures are the living room. If you look closely at the last one, you'll see Byron's dad, Jeff, doing something very important on the floor. What? I'm not sure.


We ended up renting a 'screening' sander which just took the top layer of the old wax and polyurethane off and was much easier to use than a typical drum sander. We then vacuumed, used a tack cloth, and used two coats of a water-based poly. The whole project was finished in a Saturday, thanks to the help of Byron's parents. We did have to apply the final coat to the living room floor in the dark so it's not perfect but we're happy with how they turned out! Look for 'after' pics coming soon!

Sunday, January 3, 2010

This is a story of one of my first home-making disasters...


The mess you see above was a result of one of my first attempts at doing laundry in my new laundry room. The washing machine has a tube that runs from the output on the back of the machine up and into the washtub to the right (it's the black tube in the picture). Well, on this day, the tube kept threatening to pop up and out of the tub, spewing water all over the floor. To prevent this from occurring, I decided to yank on the tube to place it more securely into the tub. What then happened was unexpected. The other end of the tube, on the back of the machine popped off... during the spin cycle! There was a veritable fountain of dirty water erupting from the back of the machine, where I couldn't reach it. I ended up man-handling the washer (thru sheer adrenaline) to the side so I could reach the back and get the tube back on. When I succeeded in doing so, the other end popped back out of the tub, continuing the spewing from another source. I finally got the tube all settled and the water fountains under control. Now I had to deal with the flood. Did I mention this was before we moved in? I had no towels or rags... newspaper was the best I could fine. Worked pretty well! Needless to say, the tubes are now securely clamped in their respective locations, courtesy of Byron.

Additionally, I found this janky mop in the basement to help with the clean-up. Mocha decided it must be some kind of wild animal carcass...


Wednesday, December 16, 2009

Pass It Thru, From Me to You!

When we first looked at this house, it came pretty close to meeting our list of requirements (I should post that sometime!). One of the things it was missing was an open floor plan. We were pretty realistic about this item on our wishlist, as most of the houses we could afford were built before the advent of the popular 'open concept' floor plan.

After thinking about it for a while we decided that the empty wall in the kitchen (empty save for an outlet and heating register) could be knocked out to create a more 'open' feel to the living space in the house. When doing our pre-purchase inspection, we found out that said wall was load-bearing. And, being proud new homeowners, we didn't want to cave our pretty new roof in. This is where a pass-thru comes in.

To refresh your memory... this is what the room looked like before:


Behind that big empty wall on the left is the kitchen. This is the view from the front door.

After determining that a pass-thru would let the wall remain load-bearing (and determining what I wanted was called a pass-thru), I started to look for some inspiration online.


Not as great as a truly open floor plan, this would allow us a little more breathing room in the kitchen and flow throughout the living/public areas of the house.

Here's our pass-thru after...

Looking into the kitchen (with a sneak-peek of the re-finished kitchen cabinets!).


Looking out from the kitchen to the front window...


From the front door again...


And the gratuitous beagle shot.


All in all, we're very happy with our pass-thru. It was well worth the money to have someone do this for us. Our guests don't know it isn't original and it makes entertaining and watching Jeopardy while cooking dinner so much easier!

Friday, December 11, 2009

I'm still being a bad blogger (but... I'm being a good student!) so I'm going to post a bunch of pictures to try to get you all up to speed... we're still in October in Fruits/Roots land!

Up first... our ugly, broken, thankfully-not-glued-to-the-wall mirror. Marcia taped it all up so she, Callie and I could remove it safely. I neglected to get a photo of the way the previous owners updated the paint colors by carefully painting around the broken section...


Here are some 'action shots' of some of my painting supplies. I am/was so sick of painting. I went to the massage therapist because I hurt my back and she asked me what I'd been doing because my right side was so much tighter than my left. I couldn't think of it at the time but Byron mentioned later that I'd spent dozens of hours painting in a very short period of time!

The paint color in the office and guest room is "Tatami Mat" by Behr.


Buy yourself an angled 2" good quality cutting-in brush. It was the best $10 we spent. Another fine recommendation from John and Sherry at www.younghouselove.com, our home reno/deco idols!


Having a 5'10" sister-in-law is very useful. Saves money on ladders. ;)


Having a 13" tall beagle does not.


After applying the fancy, color-changing spackle to the walls, Callie declared it looked like our house had leprosy. Thankfully, it dried clear. That wall to the left now has a giant pass-thru in it and the whole living/dining/hall is painted "Sanctuary" by Behr!


I'm going to scour my hard drive and SD cards... see what other photos I can come up with. We're having our first real 'party' this weekend with my classmates so hopefully I'll remember to get some photos of the house all dressed up in its holiday finest! :)

Sunday, November 22, 2009

Polyvore!

There's this great website - www.polyvore.com - which allows you to make digital collages of images from the web. Here's a few I've made!

This first one is an inspiration for our bedroom. We already have the Hemnes dresser from IKEA, and I'd like to get the pictured Avington headboard from Target. We ended up going with a paint called "Juniper Ash" by Behr. It's a blue/grey/green color. I have big plans to stain the nightstands dark like the ones pictured and we have light blocking curtains in a tan/taupe color as well. We'll have to see if you think our bedroom turns out like this collage!


Here is another board I made when we were registering for wedding gifts and trying to imagine them in a fictitious "someday" house instead of our apartment.


Our bathroom still needs some work, mostly because I got off the painting train and haven't been able to get back on! :) Look for progress in the future!

Finally, here's the board I made when we were registering for kitchen items. It's not so much decor as 'stuff', but I think you get a feel for the mood I want in the kitchen. We have almost all of these things, except for the cupcakes, unfortunately! :)


Looking back on this post, I see how much I like that seaglass green color! So, it's not surprising I just purchased a green 'demijohn' bottle a bit like these! ($15 at TJMaxx!)


Hope you're liking my inspiration... hopefully soon I'll be moving onto the 'after' pictures!

Thursday, November 19, 2009

In Progress

Here are some photos of some of the work we've been doing. It's much more complete than this now, but I like to show the 'before,' 'during,' and 'afters'. :)

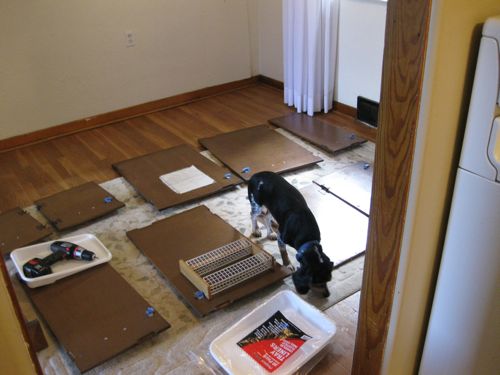
Here are all of the kitchen cabinet doors being laid out and labeled for easy reinstallation. Mocha is supervising.


This is the kitchen 'before,' with doors removed.


Here is one view of the kitchen primed with Oil-Based Kilz primer. We got our cabinet painting technique from www.younghouselove.com, my favorite home renovation/decoration blog.


Here's another view.


These are the doors on our side porch, laid out and drying on the sawhorses (AKA picnic table benches).


Mocha was tired of supervising and decided to play with her beloved peanut butter jar instead.

Tuesday, November 17, 2009

Beagle Containment

So we now have a fence to keep the dog from running away. She tried to convince us that she would just stay in the yard of her own volition, but we didn't believe her.

Thanks to Jeff and Justin for their help in putting the fence up last weekend.

Here is the yard before..


And after...


And here is the little one surveying her territory.